Help document
INDMEM DMPG3N SSD Use Guidelines for MacBook Air, MacBook Pro
YouTube video instruction search keywords: INDMEM MACBOOK SSD INSTRUCTION
IMPORTANT NOTICE:
Before moving out original SSD,
Update Mac host to macOS 10.13 High Sierra (10.14 Mojave / 10.15 Catalina).
Why should update Mac before taking off the old SSD?
Because if the EFI firmware (on Mac's motherboard) is too old, it can not support our PCIe Gen3x4 SSD, it just can works for an old PCIe SSD.
So, new SSD will not be recognized if firmware is not upgraded.
The firmware can be updated while new macOS is installed. No other way to upgrade the firmware.
How to check the MacOS version before taking out old SSD?
Start Mac, go into macOS system,
Click on the Apple logo in the upper left corner of the window, select "About This Mac".
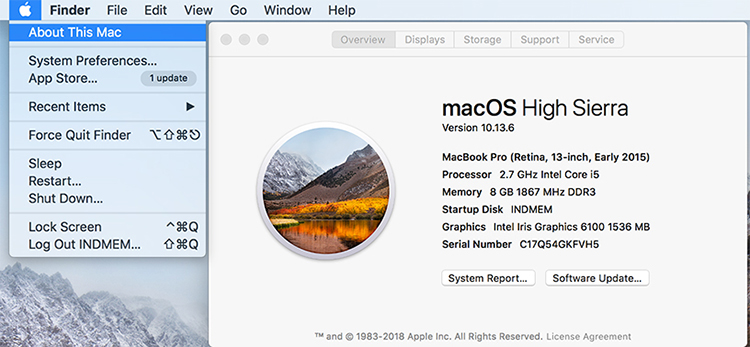
If need to upgrade, click "Software Update".
Or, download and install the version you need from Apple Store/Apple Support.
-------------------------------------------------------------------------------
Contents
Part 1: How to restore from a Time Machine Backup
Part 2: How to make Bootable Installer to install macOS
Part 3: How to install macOS from Internet Recovery
Part 4: FAQ & Solutions to common problems
The following instructions are for MacBook.
If just add SSD to iMac or Mac Pro without taking out original SSD, please Erase new SSD before use:
Ensure the macOS system is 10.13 or later. Then put new SSD into Mac and start.
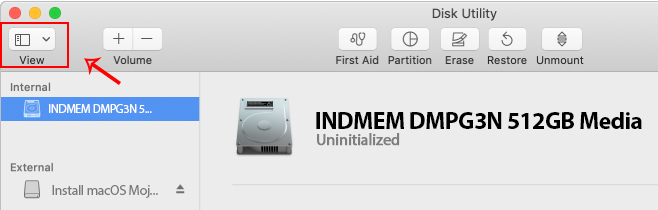
On "Disk Utility", click "View", select "Show All Devices", choose "INDMEM DMPG3N xxx", click "Erase".
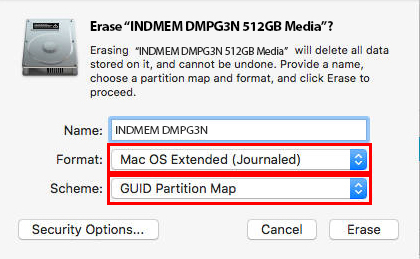
(Select “Mac OS Extended (Journaled)” as Format and “GUID Partition Map” as Scheme. )
(You can download this PDF guideline for more details.)
---------------------------------------------------------------------------------------------------------------------------------------------------Detail
Part 1: How to restore from a Time Machine Backup
What do you need to prepare before replacing the SSD?
1, Make sure the macOS has been upgraded to 10.13 or later before moving out original SSD
2, Open your computer's screwdriver
3, A portable SSD/HDD, clear all data before use
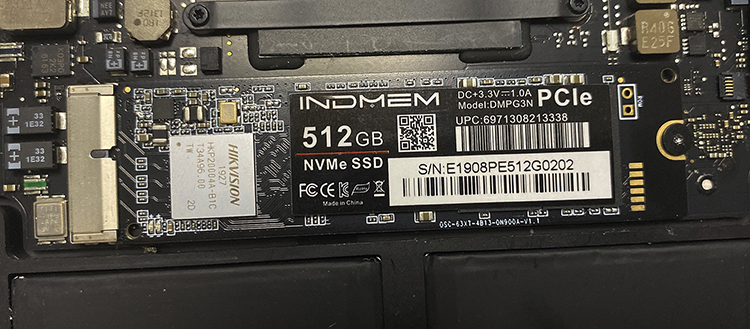
4, INDMEM SSD
(USB flash drive is not recommended because of easy data corruption! An error message may appear during the installation process.)
Step 1
Connect a portable HDD / SSD to your MAC.
Erase external drive from "Disk Utility", format type select "Mac OS Extended (Journaled)".

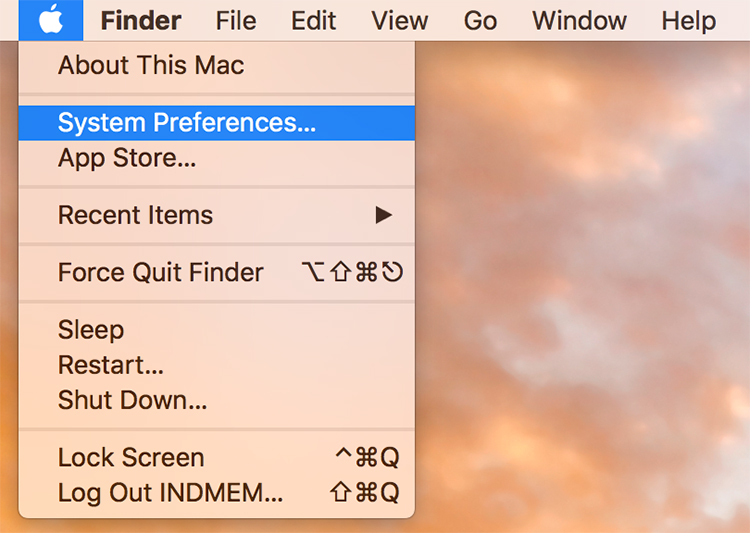
Step 2
Click on the Apple logo in the upper left corner, select "System Preferences".
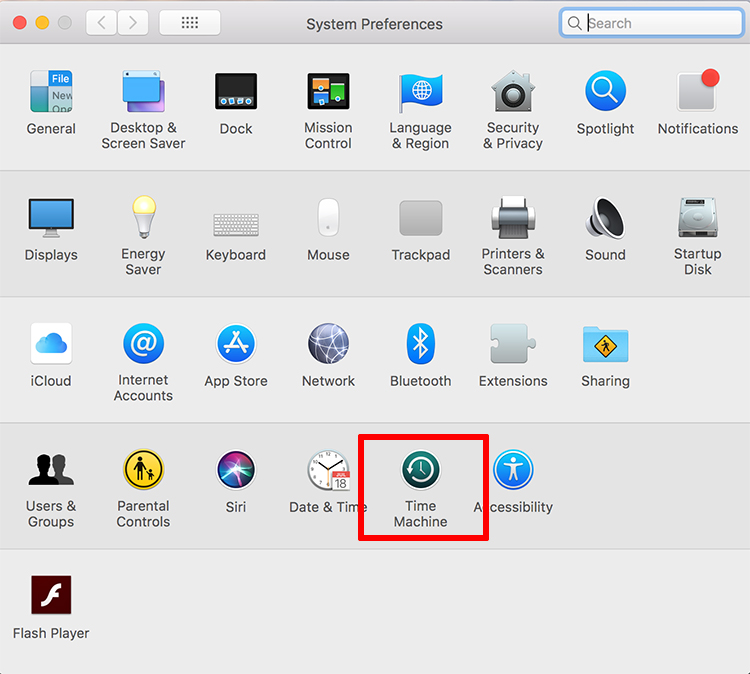
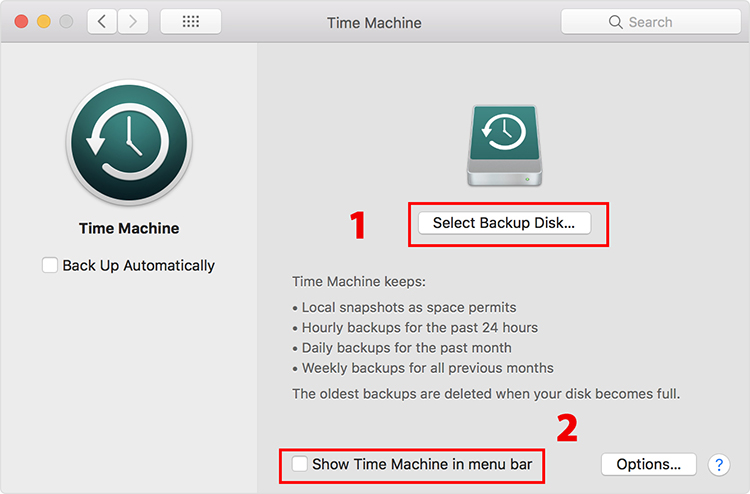
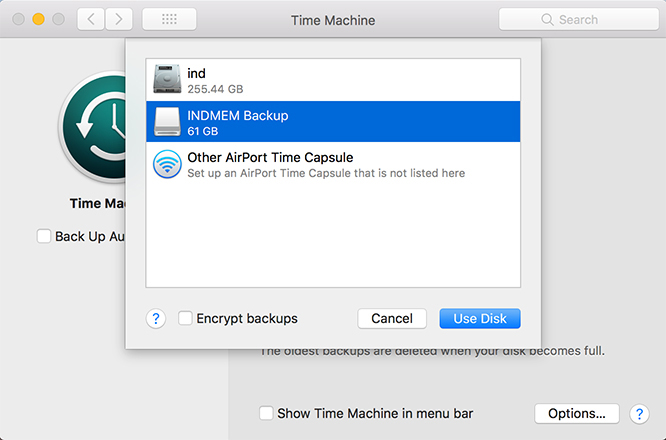
Step 3
Open Time Machine and select the external disk as backup disk. Then check "Show Time Machine in menu bar".
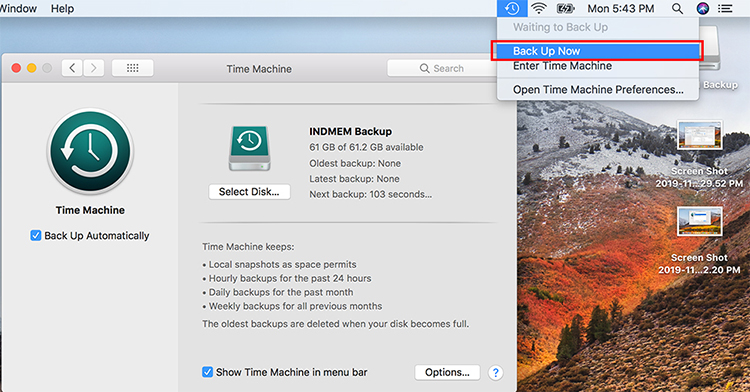
Step 4
Select "Back Up Now" from the Time Machine menu
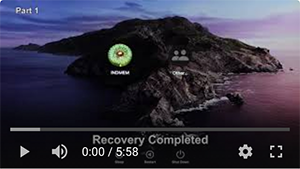
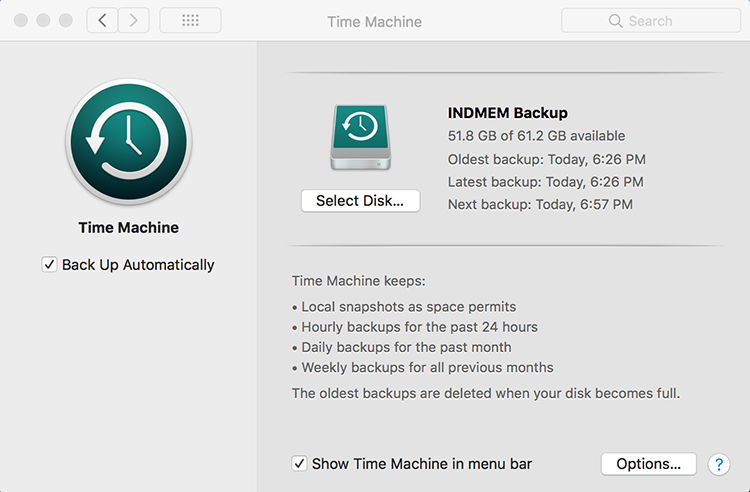
Step 5
When backup is completed, you can see the summary of the backup.
You can take portable SSD/HDD off.
Step 6
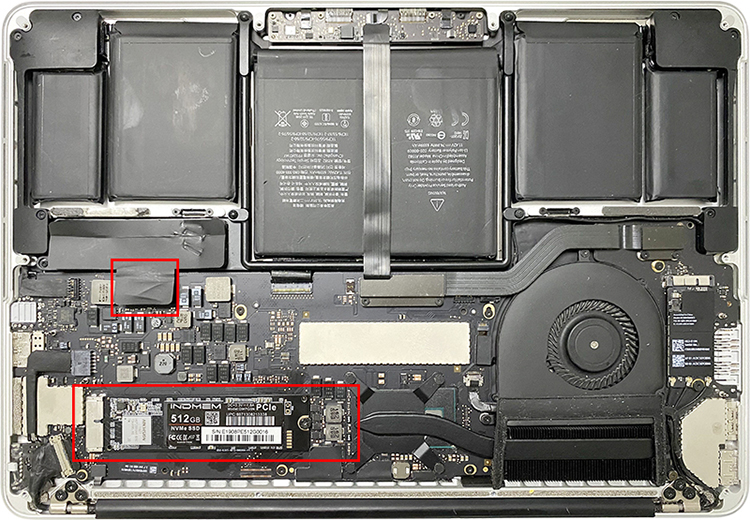
Power off and replace your original SSD with the new INDMEM SSD.
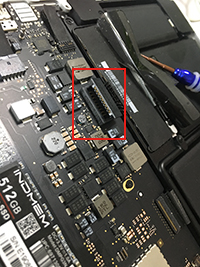
Note:
In order to protect your safety and prevent the hard disk from being damaged by static electricity, please cut off the power supply on the motherboard before removing the original hard disk.
The power socket position is different on every Mac model. Below picture was from Early 2015 Macbook Pro A1502.
Step 7
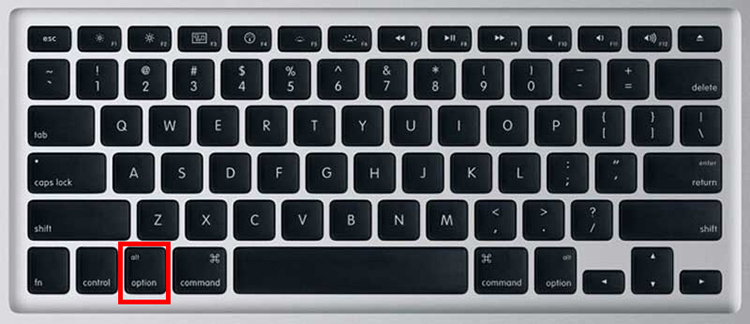
Connect backup drive, power on your Mac and hold the "Option" keyduring startup.

Step 8
Select the backup disk to restore your Mac OS.
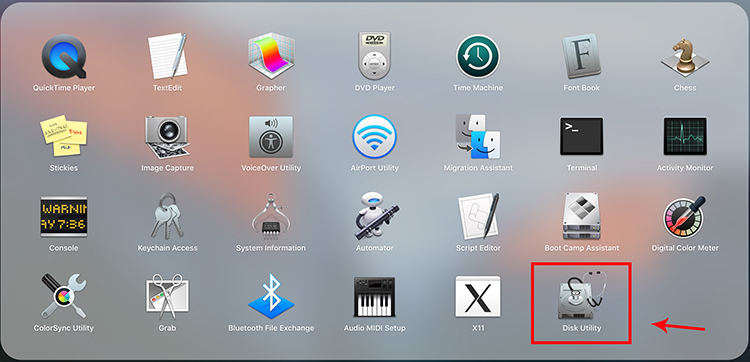
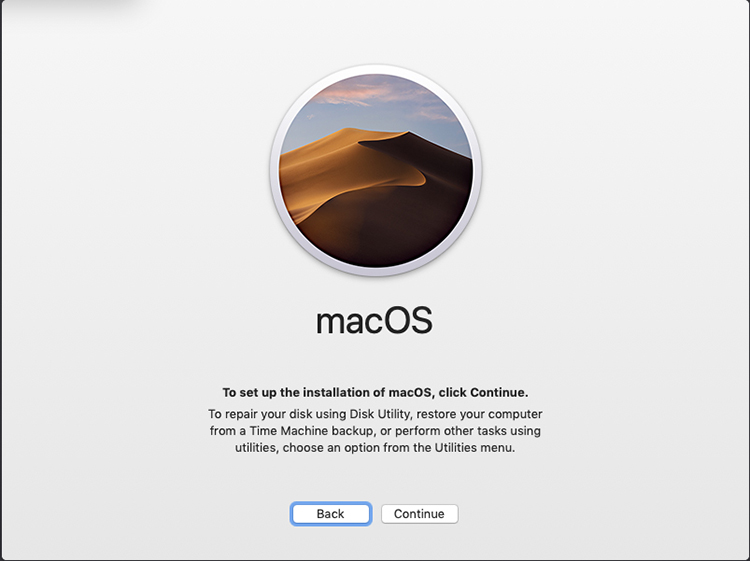
Step 9
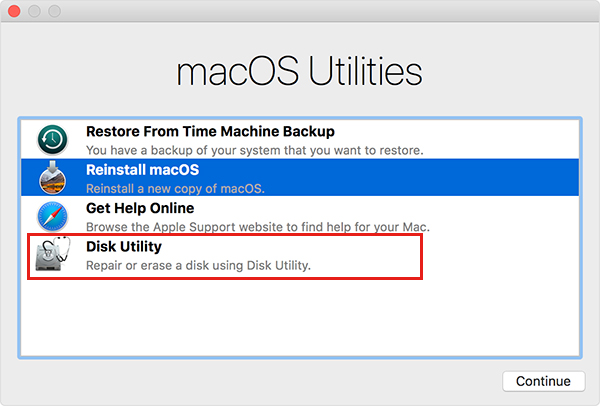
Select "Disk Utility”. Click "Continue".
Step 10
Click "View". Select “Show All Devices”
Step 11
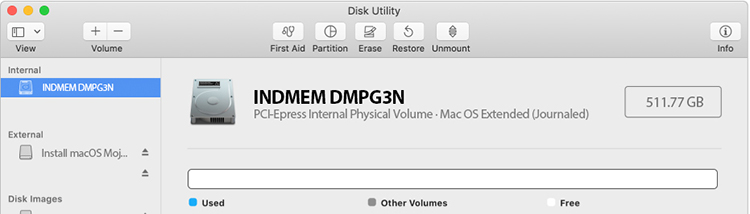
Select the INDMEM DMPG3N on top and then click on “Erase”.

Step 12
Select “Mac OS Extended (Journaled)” as Format and “GUID Partition Map” as Scheme.
Click on “Erase”, and exit Disk Utility after the Erase process is completed.
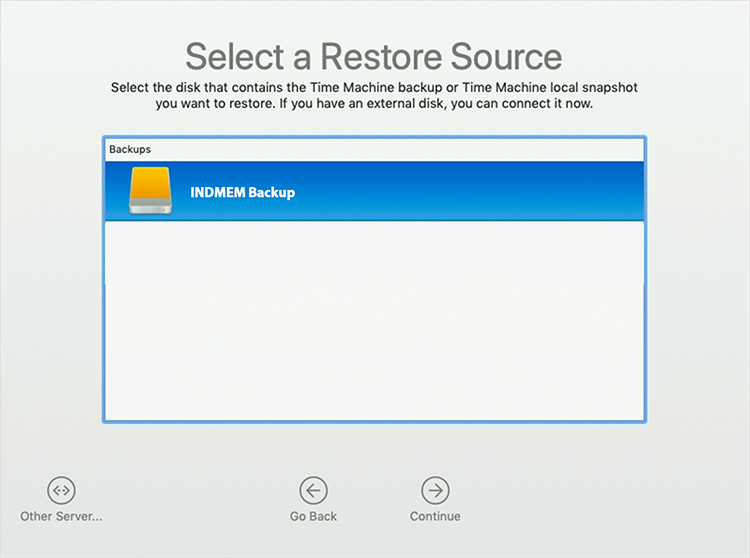
Step 13
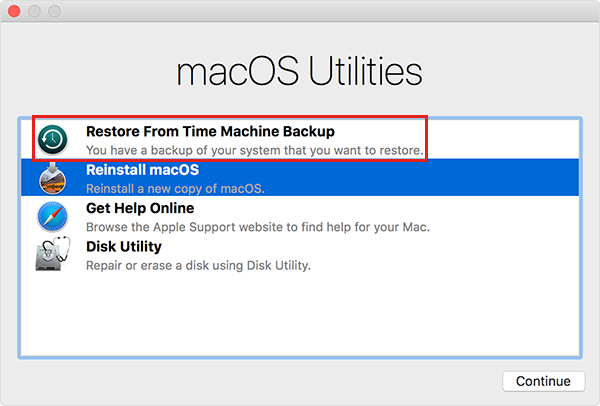
Select "Restore From Time Machine Backup" and click on “Continue”.
Step 14
Select the external Backup disk to restore your Mac OS (same disk as in Step 7) and click on “Continue”.
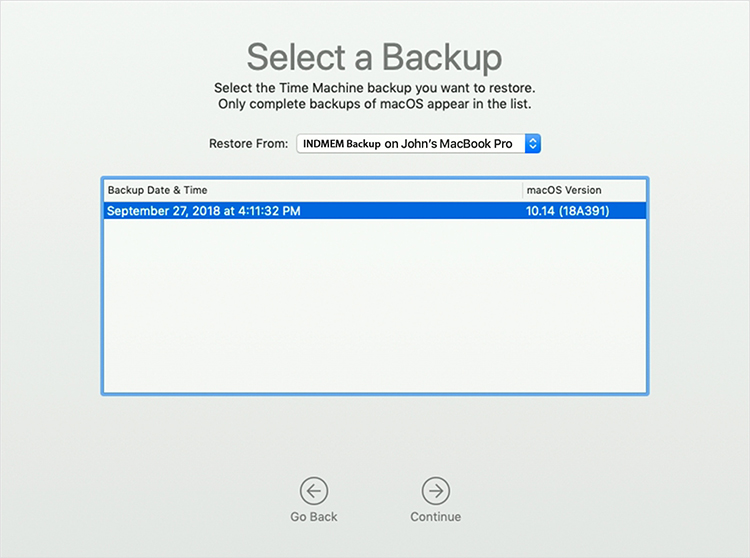
Step 15
Select a backup date and time, and click on “Continue.”
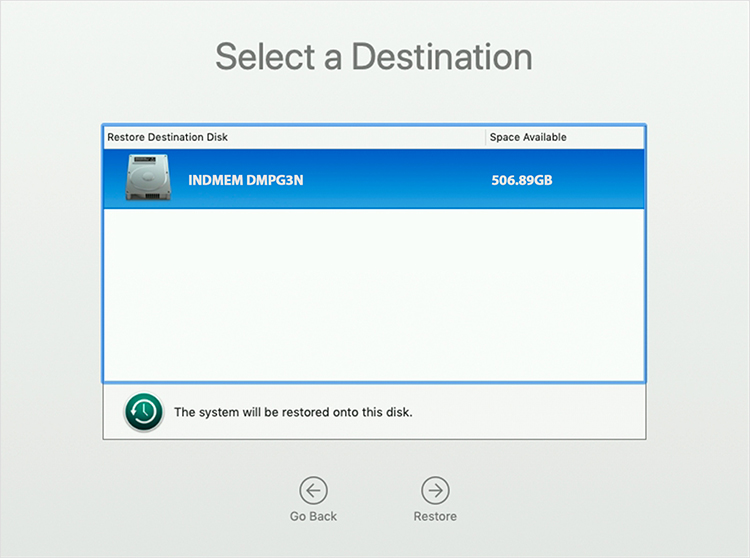
Step 16
Choose the Destination (INDMEM DMPG3N) Disk and click on "Restore".
*Please refer to the Apple website for more information.
Part 2: How to create a Bootable Installer for macOS
What do you need to prepare before replacing the SSD?
1, Make sure the macOS has been upgraded to 10.13 or later before moving out original SSD
2, An Apple computer (MacBook Air/ MacBook Pro/ iMac) that Mac OS works fine.
3, Open your computer's screwdriver
4, A USB portable SSD/HDD 32GB or more, clear all data before use
5, INDMEM SSD
(USB flash drive is not recommended because of easy data
corruption! An error message may appear during the installation
process.)
2-1, How to make a bootable installer.
Download macOS
Download a macOS installer.
1, The highest version can be downloaded directly from the App Store.
2. Other version go through Apple Support:
Download Link:
(Find the download button on the page, after clicking, it will automatically jump to the APP Store to download)
Apple support--Mac--macOS
United States:
macOS Mojave: https://support.apple.com/en-us/HT210190
macOS High Sierra: https://support.apple.com/en-us/HT208969
United Kingdom
macOS Mojave: https://support.apple.com/en-gb/HT210190
macOS High Sierra: https://support.apple.com/en-gb/HT208969
If the macOS installer opens after downloading, quit it without continuing installation.
Find the installer in your Applications folder as a single ”Install” file, such as Install macOS Catalina.
* If you're downloading macOS Catalina, macOS Mojave, or macOS High Sierra for the purpose of creating a bootable installer, your Mac must be using macOS Sierra 10.12.5 or later, or El Capitan 10.11.6. Enterprise administrators, please download from Apple, not a locally hosted software-update server.
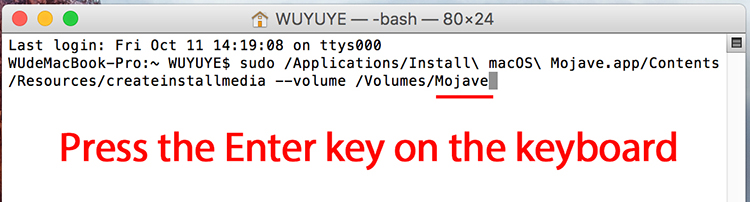
Use the 'createinstallmedia' command in Terminal (There are examples later)
After downloading the installer, connect the USB flash drive or other volume you're using for the bootable installer. Make sure that it has at least 12GB of available storage and is formatted as Mac OS Extended.
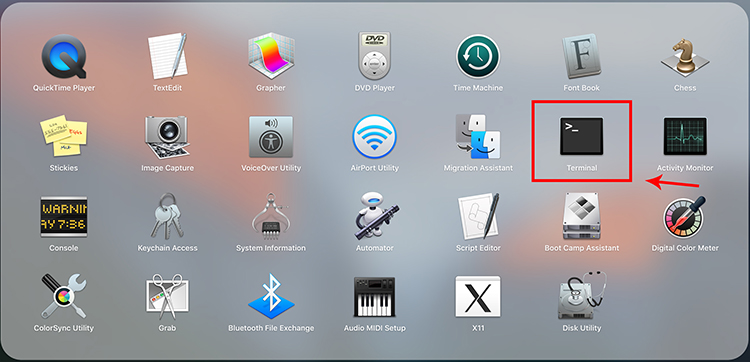
Open Terminal, which is in the Utilities folder of your Applications folder.
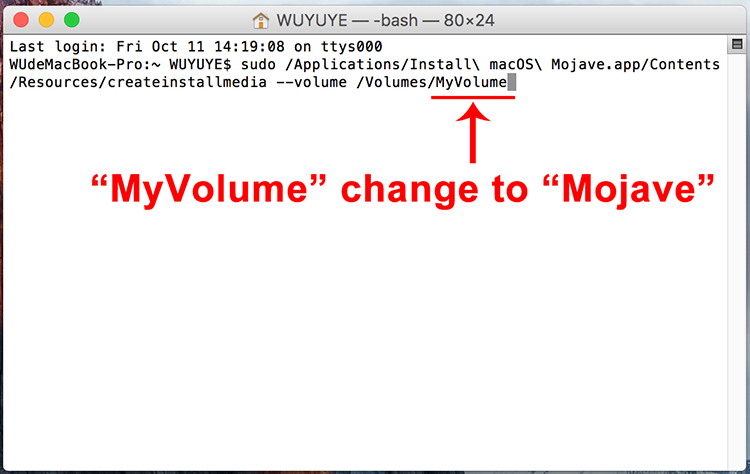
Type or paste one of the following commands in Terminal. These assume that the installer is still in your Applications folder, and MyVolume is the name of the USB flash drive or other volume you're using. If it has a different name, replace "MyVolume" in these commands with the name of your volume.(VERY IMPORTANT)
Catalina:*
sudo /Applications/Install\ macOS\ Catalina.app/Contents/Resources/createinstallmedia --volume /Volumes/MyVolume
Mojave:*
sudo /Applications/Install\ macOS\ Mojave.app/Contents/Resources/createinstallmedia --volume /Volumes/MyVolume
High Sierra:*
sudo /Applications/Install\ macOS\ High\ Sierra.app/Contents/Resources/createinstallmedia --volume /Volumes/MyVolume
Example for making bootable installer
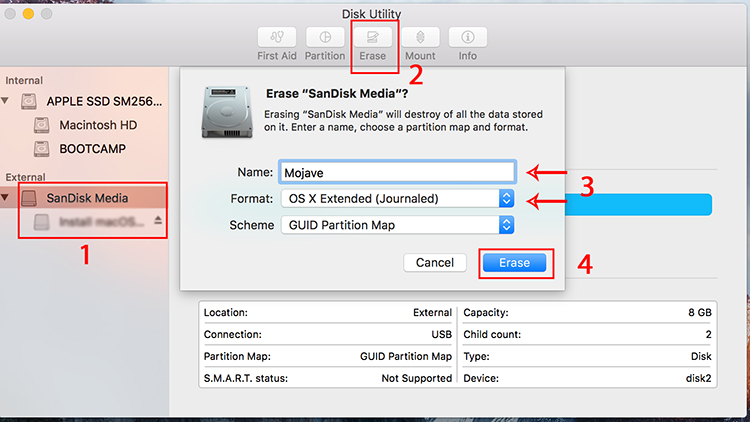
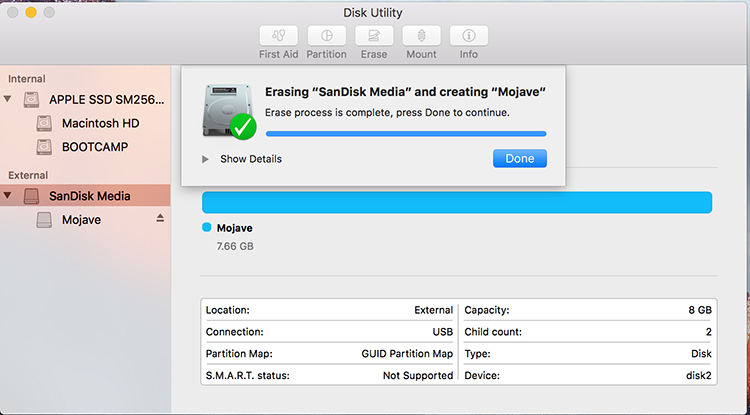
Erase and Rename the USB Flash Drive
1, Connect the USB flash drive, find it from "Disk Utility"
2, Erase and rename
"Mojave". Format type select "OS X Extended (Journaled)", Scheme type select "GUID Partition Map.
Remember the name you named USB drive.
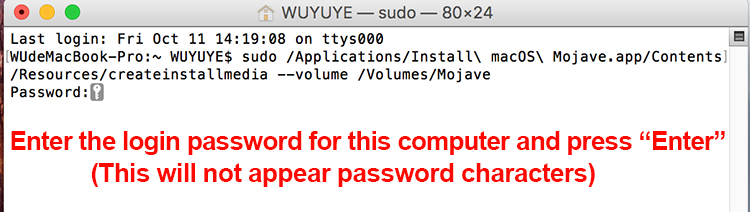
Open Terminal,
Type or paste commands
in Terminal.
The word "MyVolume" change to
"Mojave" (same as the name of USB flash drive, otherwise it can not
find the USB drive to install).
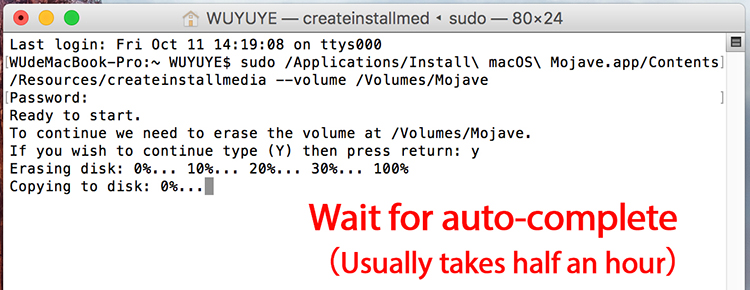
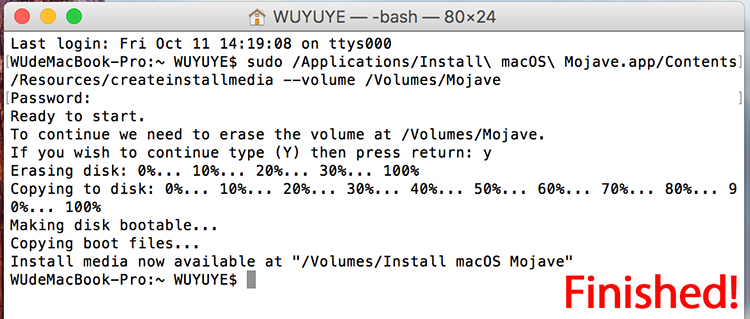
You can close this window. The bootable installer has been made to the USB flash drive.
2-2, How to install macOS system
Step 1
Power off and replace your original SSD with the new INDMEM SSD.
Note:
In order to protect your safety and prevent the hard disk from being damaged by static electricity, please cut off the power supply on the motherboard before removing the original hard disk.
The power socket position is different on every Mac model. Below picture was from Early 2015 Macbook Pro A1502.
Step 2
Connect USB Bootable Installer.
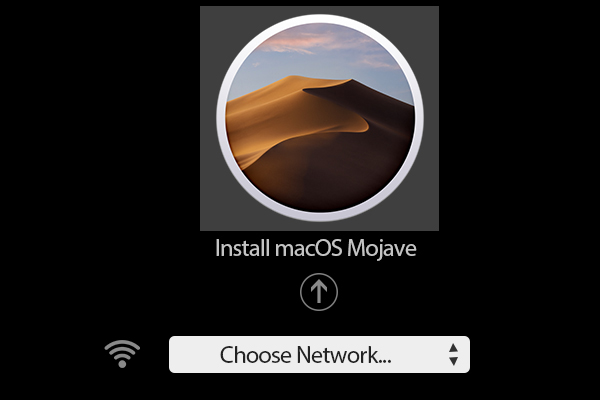
Power on your Mac and hold the "Option" key during startup.
Select "Install macOS Mojave". Click on the arrow.
Step 3
On macOS Utilities, select "Disk Utility", click "Continue"

Step 4
Click "View". Select “Show All Devices”.

Step 5
Select the INDMEM DMPG3N on top and then click on “Erase”.

Step 6
Select “Mac OS Extended (Journaled)” as Format and “GUID Partition Map” as Scheme.
Click on “Erase”, and exit Disk Utility after the Erase process is completed.


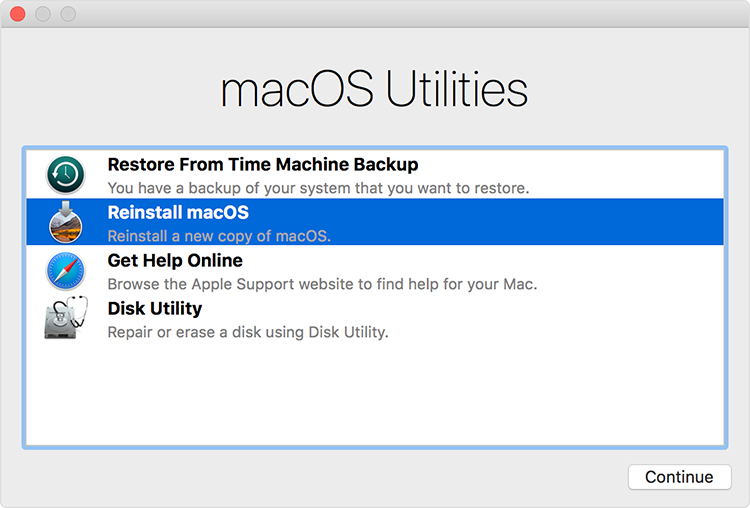
Step 7
Select "Reinstall macOS" and click on “Continue”.
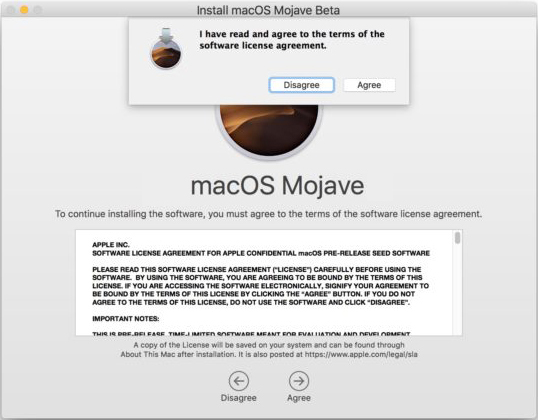
Step 8
Follow the prompts to proceed with the installation, click on “Continue” or "Agree".

Step 9
Select the hard drive you need to install. Click on “Install”.


Step 10
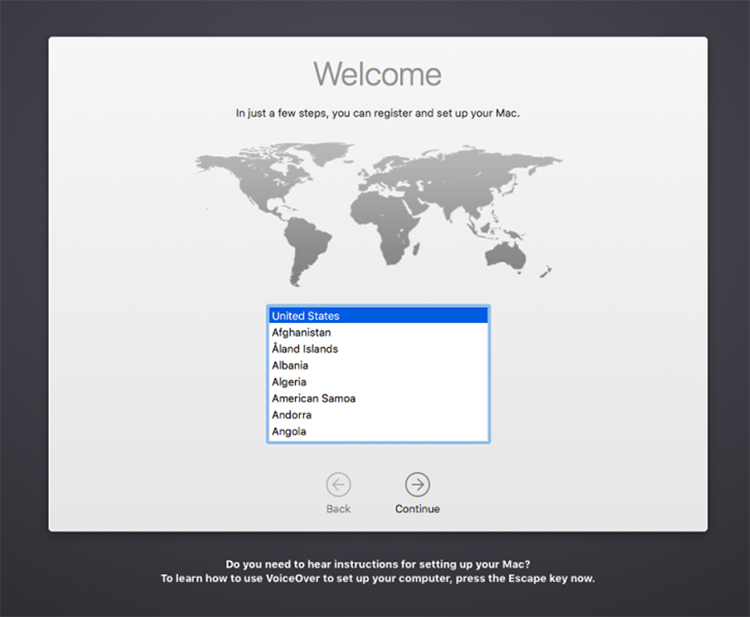
Congratulations!
When you see the below page, the system has been successfully installed.
You can take off the USB drive.
(You can set the system according to your preferences.)

Part 3: How to install macOS from Internet Recovery
Make sure the macOS has been upgraded to 10.13 or later before moving out original SSD
Step 1
Power off and replace your original SSD with the new INDMEM SSD.
Note:
In order to protect your safety and prevent the hard disk from being damaged by static electricity, please cut off the power supply on the motherboard before removing the original hard disk.
The power socket position is different on every Mac model. Below picture was from Early 2015 Macbook Pro A1502.

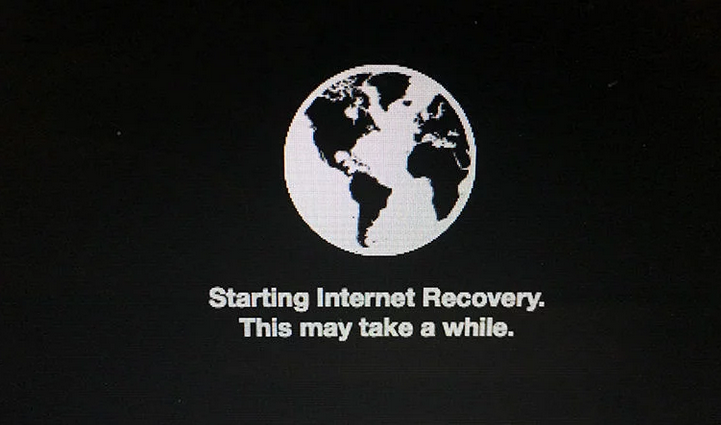
Step 2
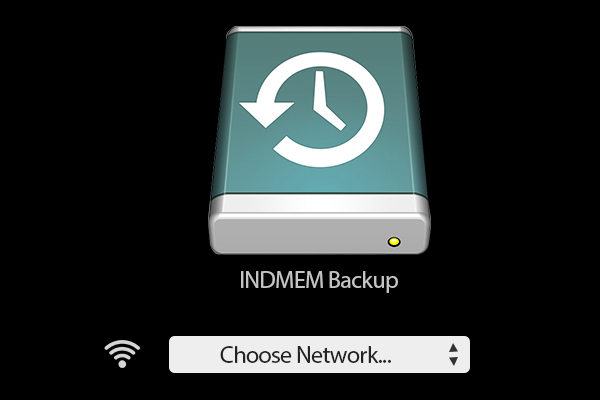
Hold on Command-Option-R, then Power, until you see the Network!
Connect the WIFI. This will leading you to load the newest macOS Utilities.

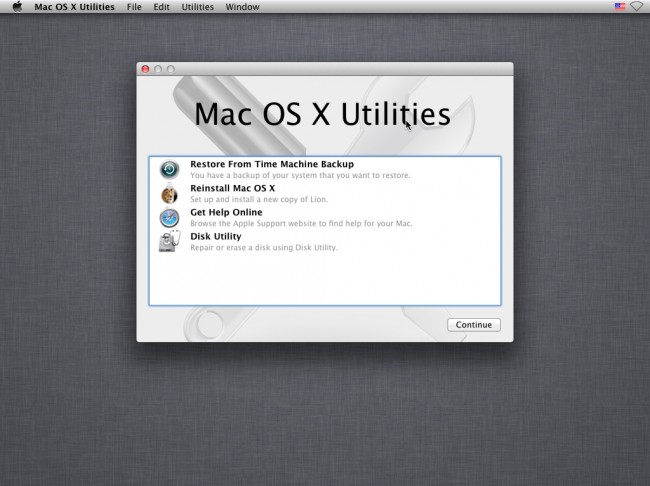
NOTE:
If you still go into the "Mac OS X Utilities" (As below picture).
This means the Mac cannot download the latest Utilities version.
A PCIe Gen3x4 SSD cannot be recognized on "Mac OS X Utilities".
macOS can not be installed by this way, please use "Part 1" and "Part 2" to install OS.
Step 3
On macOS Utilities, select "Disk Utility", click "Continue"
Step 4
Click "View". Select “Show All Devices”
Step 5
Select the INDMEM DMPG3N on top and then click on “Erase”.
Step 6
Select “Mac OS Extended (Journaled)” as Format and “GUID Partition Map” as Scheme.
Click on “Erase”, and exit Disk Utility after the Erase process is completed.
Step 7
Select "Reinstall macOS" and click on “Continue”.

Follow the prompts to proceed with the installation, click on “Continue” or "Agree".

Step 9
Select the hard drive you need to install. Click on “Install”.

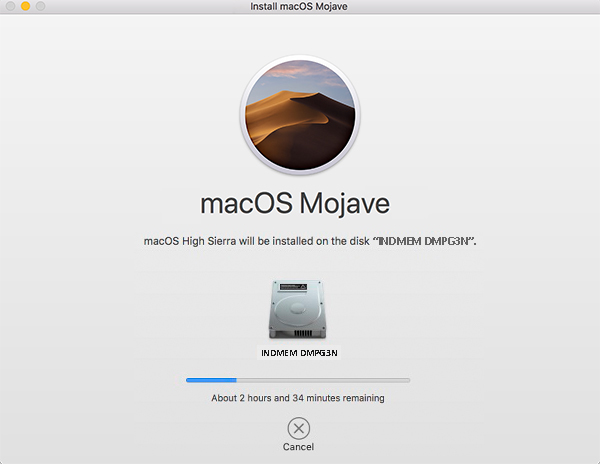
Step 10
Congratulations!
When you see the below page, the system has been successfully installed.
(You can set the system according to your preferences.)
NOTE:
This way is to download the system to your computer and install it.
It may take hours, depending on the speed of the network.
Part 4: FAQ & Solutions to common problems
1, Can i put the SSD directly into my device and boot from it?
A: NO. It will not make it work. The SSD is new and not be formatted, no system can be booted.
2, Why not recommend online installation?
A: As the installed files are relatively large. The progress of the installation will be very slow.
Sometime Internet Recovery always go into "Mac OS X Utilities", not "macOS Utilities".
Disk Utility" on "Mac OS X Utilities" can not find an unformatted SSD, can't recognize it.
3, Is there another way i can learn to format the SSD and install macOS without following the instruction?
A: Yes. You can learn other ways from Google, Youtobe, or other web. If you don't like that, please look for professional help.
4, It is hard to find the power socket on motherboard. Is it necessary to cut off the power
from it? Can I replace it directly, without having to do that?
A: This is not a must. Although there is a small chance of causing damage to the motherboard
or hard drive, but we recommend doing this.
5, After installation, it often prompts system error and needs to restart. Or, there maybe an issue with a storage device, reference code: VDH002.
A: This is usually a hint of a system crash. Need to reinstall the system.
Usually caused by 2 ways:
1, Portable hard disk or U drive disk with bad sectors, more caused by U drive disk. The system lost important DATA when making Time Machine Backup or USB bootable installer.
2, INDMEM SSD or U drive disk selected uncorrect format type and scheme type when erasing.
Solution:
Use portable HDD or SSD to make backup / USB installer again, select correct format type and scheme type when erasing hard drive or U drive disk.
6, After installing INDMEM SSD into my portable SSD enclosure, Mac can't recognize SSD, i can't format it.
A: Most of other brands of portable SSD enclosures can not work for an uninitialized new SSD. Most enclosures just work for already formatted SSD.
And, some enclosures may not compatible with our INDMEM DMPG3N SSD. This is determined by the hard disk enclosure.
Solution:
Use portable hard drive to make a Time Machine Backup or USB bootable installer.
Put the INDMEM DMPG3N SSD in Mac (Mac model must fits DMPG3N SSD) , connect portable hard drive, start Mac and hold & press "Option" key, go into "Disk Utility" from "macOS Utilities", Erase DMPG3N SSD.
7, Macbook has problems waking up from sleep
This is a known issue that occurs when using NVMe SSDs with MacBooks from 2013 and 2014. The problem exists with every NVMe SSD, even Apple NVMe SSDs, even OWC aura Pro 2, even Transcend 850 NVMe SSDs...
This problem is related to the NVMe DXE driver in the bootrom of the 2013-2014 MacBooks
However, you can circumvent this issue using the following steps! This will still allow for regular sleep, just not deep "hibernation" mode.
1) Open up Terminal (open your Applications folder, then open the Utilities folder. Open the Terminal application.)
Type in the following code in the Terminal:
sudo pmset hibernatemode 0 standby 0
Press enter (return).
If that didn't work, try also doing the following:
2)Open up Terminal (open your Applications folder, then open the Utilities folder. Open the Terminal application.)
Type in the following code in the Terminal:
sudo pmset autopoweroff 0
Press enter (return).
8, iMac crashed when waking up from hibernatiom, self restart.
The iMacs before 2017 have issues with the drive's power states after upgrading the blade SSD with a non-Apple NVMe. The late 2013, late 2014, mid 2015 iMacs will crash when waking from hibernation, self restart with two start-up chimes. The late 2015 iMac will either "restart because of a problem", or show a folder with question mark icon (depending on the system event produced).
Until Apple patches the bootrom with the full NVMe driver that 2017 and 2019 iMac models have, the only way to prevent your iMac from crashing is type the following command in Terminal:
(open your Applications folder, then open the Utilities folder. Open the Terminal application.)
For Late 2015 iMacs (disabling normal sleep) -> sudo pmset -a hibernatemode 25 standby 0
For Late 2013 until Mid 2015 iMacs (disabling hibernation) -> sudo pmset -a hibernatemode 0 standby 0 autopoweroff 0
(for the models in late 2013, late 2014, mid 2015, alternatively, instead of standby 0, you can leave the standby at 1, and use for example standbydelayhigh 2592000 which equals to one month in seconds)
9, MacBook Air / Pro BootCamp installation issues (Windows 10)
(Make sure you have a full backup with something OTHER than Time Machine. )
During installation of Windows 10 via BootCamp, a blue screen may occur.
Here are the two recommendations to Install BootComp with success on a MacBook Air / Pro with a NVMe SSD :
- leave the MagSafe charger plugged in during the whole installation process (don't run on battery)
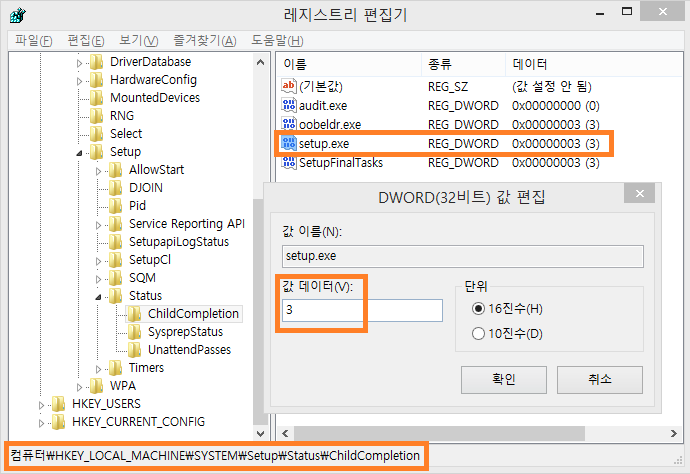
- When you see the error pop-up, "The Computer restarted unexpectedly....", please do the following :
1. Press Shift + F10 keys.
2. Launch "regedit".
3. Find this directory, "HKEY_LOCAL_MACHINE\SYSTEM\Setup\Status\ChildCompletion"
4. Once you can see "setup.exe" in the right section, double-click it and modify the value to 3.
5. Close the regedit.
6. Reboot
10, How to fix various other issues that may occur with Boot Camp Assistant
- Repair partitioning:
Terminal> "diskutil repairDisk disk0"
It will say "Repairing the partition map might erase disk0s1, proceed? (y/N)"
Press "y"
-----
If you get "An error occurred while partitioning the disk" in Mojave Boot Camp Assistant, this is a problem with disk overallocation. To fix:
- Shut down your Mac.
- Start and hold Cmd-S to boot into single user mode.
- Type: "fsck_apfs -oy /dev/disk0s2"
- It will ask you to confirm, type in y and press Enter.
- When finished (up to 3 minutes) type reboot and press Enter.
If there was a problem with overallocation, you may see this line in the output: "Overallocation detected on Main device" And then another line may appear: "Fix overallocation"
Tip from: https://apple.stackexchange.com/questions/354694/cannot-partition-w-boot-camp-assistant-on-macos-mojave
Thank you for your support!
CATEGORIES
CONTACT US
Contact: Xu Xiu Lian
Phone: +86 13798485579
Tel: +86 13798485579
Email: indmem.global@gmail.com
Add: A-609, Jin Yu Cheng Building Bantian Street,Longgang District, Shenzhen, China
 Send Email
 JCcms
JCcms